Static analysis (or static code analysis) is an analysis run on the source code, against some set rules, even before the program runs (usually even before the unit tests). This is a kind of debugging that is done without even running the program and this is usually the first step taken towards code-analysis. Since the analysis is run against some set rules, it also helps to maintain coding conventions among dev team. You could definitely do it manually during code-review process, but human errors would creep in and it will not be as effective or efficient. To deal with this, we now have some amazing automated tools like lint, which now comes embedded in Android studio that we can use. In this blog post we are going to make use of such tool and will iterate upon an Android project as a demonstration.
How does linting works?
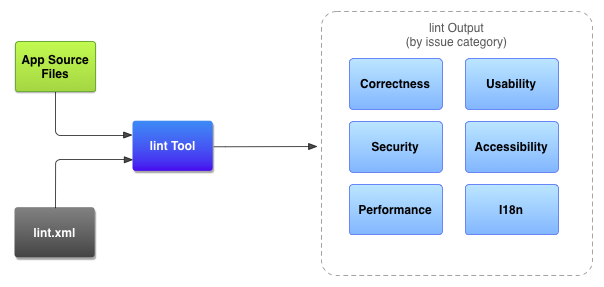
Linting follows the rules defined in a configuration file like lint.xml. Lint tool then runs those rules against the source code files. See the below image for better understanding.
Using lint in project
There are two ways to do it, using Android Studio and other using terminal and gradle.
Using Android Studio
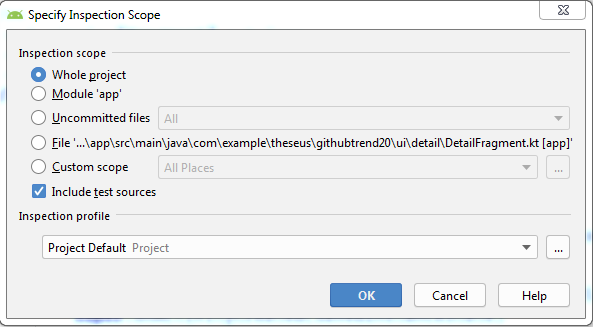
There are two ways to run the lint tool on your source code. You can just do it from the toolbar Analyze > Inspect Code.. It will then open a dialog where you can specify the scope of the source code on which the lint tool run. Below is an image demonstrating that.
 After a while, Android studio will present you the results in the Inspection results window as shown in the below image.

Using Gradle
To run lint from Gradle, you can use following commands.
On Windows: gradlew lint
On Linux or Mac: ./gradlew lint
Note that when you run the above commands, gradle by default runs lint on the release build. In order to run it on a different build eg. debug, you need to add the build name as gradlew lintDebug. After the linting is complete, the results are generate in html and xml format.


Note that if you have any lint error, Android studio may not generate the results so you need to ad below lines in your app level gradle file:
lintOptions {
            abortOnError false
Customizing linting rules.
Perhaps your needs or team’s coding convention is different from the default configuration , so you can change settings from gradle files as below:
lintOptions {
            abortOnError false
            disable 'ContentDescription'
    }
In the above example, we’ve disable lint check for ContentDescription warning in the entire project. If you don’t want to apply this to the entire project but just to some files, you can use @SupressLint annotation on Kotlin or Java files and tools:ignore on xml files. Checkout the example below:
@SuppressLint("NewApi")
override fun onCreate(savedInstanceState: Bundle?) {
    super.onCreate(savedInstanceState)
    setContentView(R.layout.main)
In case of XML files:
<ImageView
            android:id="@+id/avatar_url"
            tools:ignore="HardcodedText"
Remember a few minutes ago we said that lint tool makes use of lint.xml configuration file? You can create your own lint.xml file and set rules according to your needs. In the below example, we have created our lint.xml file and set a rule to ignore missing contentDescription warning.
 <?xml version="1.0" encoding="UTF-8"?>
<lint>
    <!-- Disable the given check in this project -->
    <issue id="ContentDescription" severity="ignore" />
</lint>
After that, you need to put the reference in the gradle file as:
lintOptions {
        lintConfig file("lint.xml")
    }
Note that in the above case, lint rules you specify in the lint.xml applies to the entire module. If you want to specify it for specific path, you can do so as:
<issue id="ContentDescription" severity="ignore">
  <ignore path="src/main/res/values/list_item.xml" />
</issue>
So that’s it! Go ahead and use this awesome tool in your next project and make a step towards quality code. For more information, feel free to visit this link Lint